
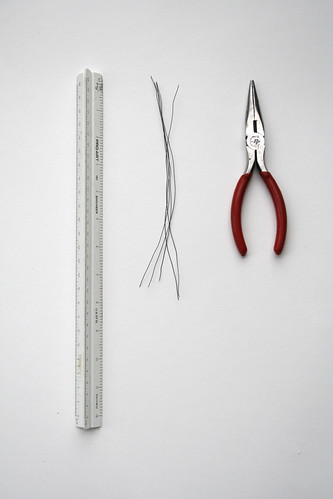
Materials:
2 pairs of needle nose pliers with wire cutting feature
Copper or steel wire, 26 gauge is preferred
Ruler for measuring wire for cutting
Beads, bases or other embellishments (optional)
5 minute or quick dry Epoxy for securing tree to base
Safety glasses (& rubber gloves if you have a hard time holding the wires)
*I've used brass wire, but it's much too stiff to bend easily and silver wire tends to be too soft and breaks too easily.
*You can use a lower gauge. thicker wire, but it'll be harder to work with. But it's helpful if you want to make bigger trees.
Step 1:
Cut five lengths of wire about 7"-8" long. As a rule of thumb the wire should be three to four times the height of your tree. I'm making a 2" tree so these wires are 7"-8"long. It also depends on the shape of your tree... an upright will need less wire length... a weeping will need more. You'll get the hang of it once you make a few.
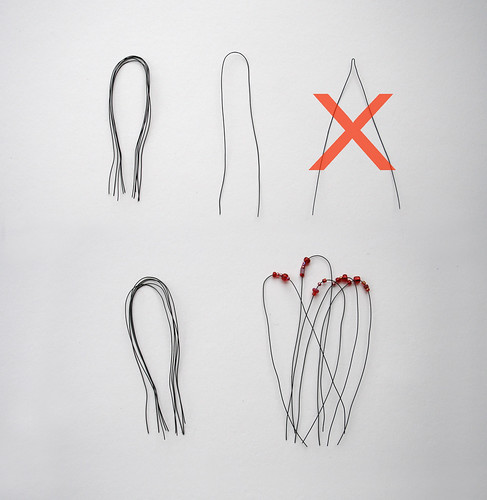
Step 2:
Loosely bend wires in half and make sure not to crimp the wire (like in the upper right). You want a U shape and not a V shape. Gather all the wires together and match up the cut ends.
If you want a beaded tree then insert 3-5 beads per wire (lower right). Basically each bead equals to the number of branching you get.
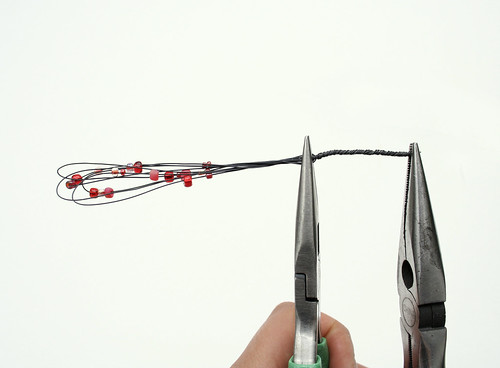
Step 3:
Starting from the cut ends and twist all the wires together. It may be easier to start the first few twists with your fingers then use the pliers to tighten the turns. It takes a few tries to get the twists tight and even, but be careful not to over twist or you'll break the wires. Keep twisting until you get your desired trunk length. This is a judgment call, I usually go half way up like this:

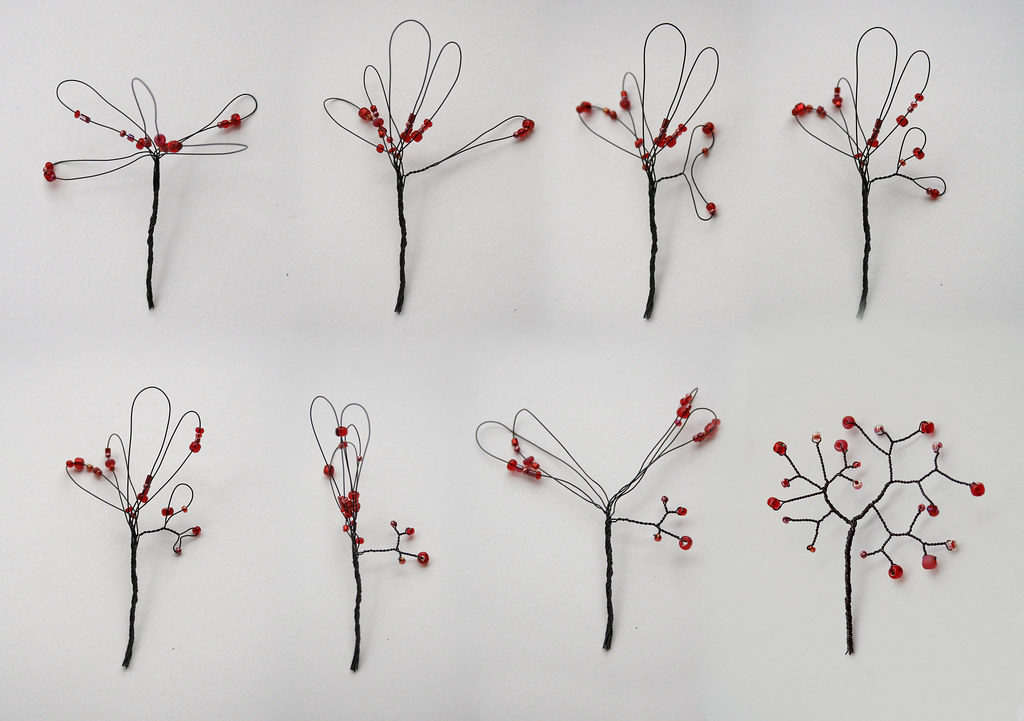
Step 4:
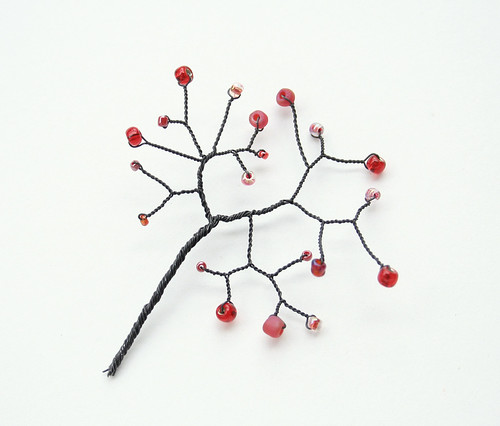
Once you’ve finished the trunk fan out the looped ends and start branching. Divide and twist… divide and twist. Work each branch to completion then move on to the next one. There’s no wrong way to do this, just use your judgment. You’ll get better at making more realistic trees after you make a few. Just be sure to not over twist or the wire will break.
If you’re working with beading make sure to divide the beads evenly when you branch. Each bead will sit at the tip of each branching.
(*Tip: More branches you give you shorter trees/branches. Fewer branchees will give you longer limbs or taller trees. Longer branches will be better for a windswept or weeping tree.)
Have some fun... don't worry too much about how it'll turn out until you've got the process down. The fastest way I learn is by making mistakes :) This is what finished branching looks like:
Finishing/ Step 5:
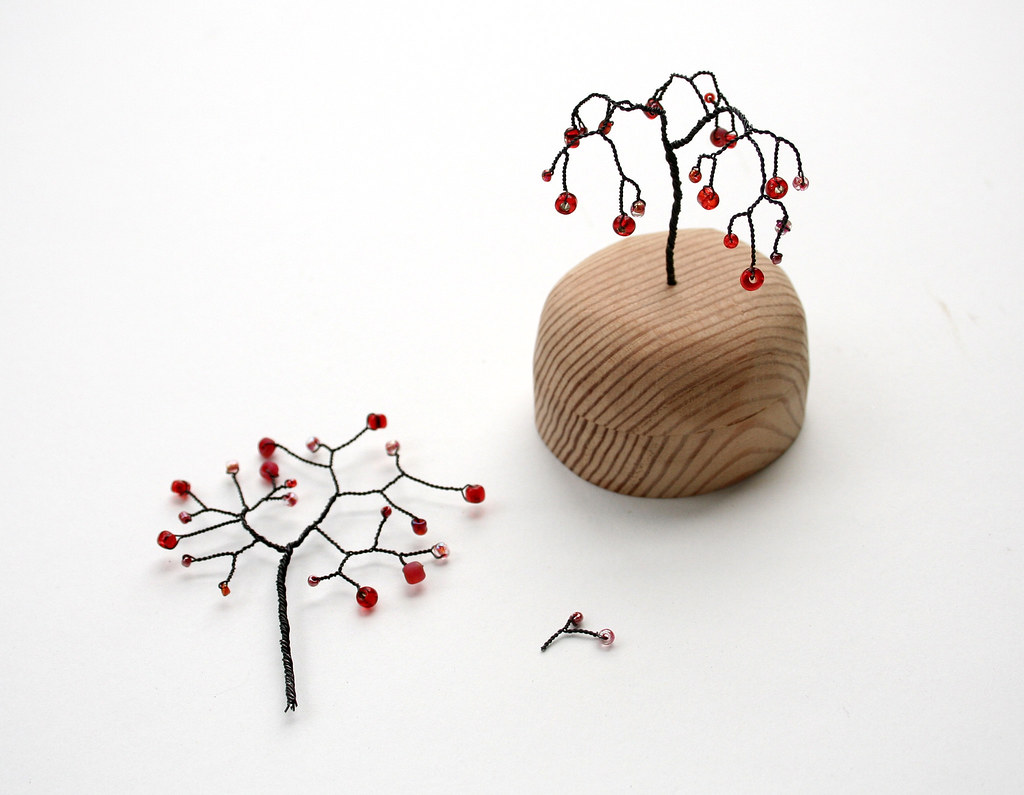
Now that you have your finished branch you can shape it to become your tree! This is where a little creativity and play comes in. The wires are very malleable so feel free to bend away... try different forms. If you're unfamiliar with tree shapes I recommend looking at Bonsai books for inspiration. For a good base drill a small hole in any suitable object. Apply some epoxy to base of tree to secure your planting :)
Have fun folks!
Here's more of my DIY's
That tree is very cute my dear! Good job!
ReplyDeleteHello.
ReplyDeleteIt's a very very very cute tree.
thanks for sharing this - I'm inspired to make my own!
ReplyDeleteThank you everyone :)
ReplyDeleteYour canes are looking good Betty.
This is so sweet :) Thanks for sharing
ReplyDeleteTracy/Romancement
this is such a wonderful tutorial! thank you for sharing, and I would be trying it out when i get the chance! :)
ReplyDeletehello , i made a tree with your technic and it looks wonderful :X thx for your tutorial >:D< merry christmas and a happy new year :) Roxana ( Roxanne ) from Romania
ReplyDeleteThanks Roxana :) I'm glad you tried it!
ReplyDeleteIt's a fun quick project.
SO great! I definitely want to try this and get creative with the bases :) Thank you for sharing!
ReplyDeletevery cool project!
ReplyDeleteI pinned your tree on my blog...so I thought I'd come check out the blog behind the pin! Glad I did...new follower here! YAY!
ReplyDeleteTif
Ramblings of a Southern Belle
http://www.her-southern-ramblings.blogspot.com
Thank you!
ReplyDeleteThank you!
ReplyDeletethis is just so beautiful
ReplyDeleteWow great help this tutorial!
ReplyDeleteI came across your work on Pinterest. Great stuff and very nice blog. I took liberty to publish your miniature tree tutorial on my blog http://gunadesign-jewelry.blogspot.com. In case you have any objections let me know and I will take it of
ReplyDeleteGuna